My Announcements and Achievements

Showing posts with label garlic. Show all posts

Thursday, January 19, 2023

GARLIC BROWN SUGAR GLAZED SALMON

Garlic Brown Sugar Glazed Salmon has the most amazing garlic brown sugar soy glaze. The flavor is delicious really makes Salmon juicy and so good.

Please be sure to follow Me

My Instagram Follow me https://www.instagram.com/craftywitchywoman13

https://cherylstastyhomecooking.blogspot.com/

My tiktok.com/@witchymoonwoman

My Youtube https://youtube.com/user/cheriluv1

Follow me on Facebook https://www.facebook.com/CherylsCookingandCraftingatHome

My Crafty Blog https://cherylscreationsblog.blogspot.com/

Please be sure to follow Me Thanks


SERVINGS:4

What you need:
2 pounds salmon I used Atlantic salmon
2 Tablespoons olive oil
1/4 cup brown sugar
1/4 cup soy sauce
3 garlic cloves minced
juice of one lemon
1 teaspoon salt
1/2 teaspoon pepper
garnish with sliced lemons and chopped parsley if desired

How to Make it:

Preheat oven to 350 degrees. Line a baking sheet with aluminum foil. Lay the salmon on top and sprinkle with salt and pepper. Fold up the sides of the aluminum foil around the salmon.


In a small bowl whisk together the olive oil, brown sugar, soy sauce, garlic, lemon juice, salt, and pepper. Pour the glaze over the salmon. Top the salmon with aluminum foil and seal.

Bake for 20-25 minutes or until salmon is cooked throughout. Take the foil off of the top and baste the salmon with the sauce in the foil. Broil for 3-5 minutes or until brown and caramelized. Garnish with lemon slices and chopped parsley if desired.

Nutrition

Serves: 4


Calories449kcal (22%)
Carbohydrates15g (5%)
Protein47g (94%)
Fat21g (32%)
Saturated Fat3g (15%)
Cholesterol125mg (42%)
Sodium1496mg (62%)
Potassium1169mg (33%)
Fiber1g (4%)
Sugar14g (16%)
Vitamin A90IU (2%)
Vitamin C0.7mg (1%)
Calcium46mg (5%)
Iron2.3mg (13%)

Friday, December 9, 2022

Hamburger Stew


This stew is easy, inexpensive, some call it poor man's stew because it uses ground beef or chuck instead of beef roast. We like it a lot, instead of using roast, it's full of flavor with lots of spice, not too hot though.

Please be sure to follow Me

My Instagram Follow me https://www.instagram.com/craftywitchywoman13

https://cherylstastyhomecooking.blogspot.com/

My tiktok.com/@witchymoonwoman

My Youtube https://youtube.com/user/cheriluv1

Follow me on Facebook https://www.facebook.com/CherylsCookingandCraftingatHome

My Crafty Blog https://cherylscreationsblog.blogspot.com/

Please be sure to follow Me Thanks


What you Need:

2 1/2 lb. ground chuck
1 whole large onion, diced
2 stalks celery, diced
3 cloves garlic, minced
1 can (14.5 ounces) can whole tomatoes
3 c. beef stock or beef broth, plus more as needed
1 whole yellow bell pepper, seeded and diced
1 whole red bell pepper, seeded and diced
1 whole green bell pepper, seeded and diced
4 whole carrots, peeled and sliced on the diagonal
5 whole red potatoes, cut into chunks
1 small can tomato sauce
1/2 tsp. kosher salt, more to taste
1/2 tsp. black pepper, more to taste
2 tsp. dried parsley flakes
1/2 tsp. ground oregano
1/4 tsp. cayenne pepper, more to taste
(I use a tsp cajun seasoning instead of oregano and cayenne sometimes)
2-3 tbsp cornstarch for thickening


How to Make it:

1 In a large pot over medium-high heat, brown the meat with the onion, celery, and garlic. Remove the pot from the heat and drain off as much fat as you can. (Discard the fat once it cools.)

2 Return the pot to the heat and add the rest of the ingredients. Stir to combine, then bring to a boil. Reduce the heat, then cover the pot and simmer the soup for 15-20 minutes, until potatoes are tender but not overly mushy. 

To thicken this mixture to a stew consistency, scoop out 1/2 cup broth, wisk in corn starch till blended, then stir back into your pot. Stir and let simmer just a few minutes till it thickens up.

3 Stew should be somewhat thick, but if you'd like it to be more "soupy," add 1 to 2 cups more broth OR hot water and heat through. Taste and adjust seasonings, adding more salt if needed. Serve with crusty bread!

Thursday, December 8, 2022

Creamy Italian Sausage and Potato Soup

This is a easy soup, so creamy and full of flavor and so good. It really doesn't take long at all.

Please be sure to follow Me

My Instagram Follow me https://www.instagram.com/craftywitchywoman13

https://cherylstastyhomecooking.blogspot.com/

My tiktok.com/@witchymoonwoman

My Youtube https://youtube.com/user/cheriluv1

Follow me on Facebook https://www.facebook.com/CherylsCookingandCraftingatHome

My Crafty Blog https://cherylscreationsblog.blogspot.com/

Please be sure to follow Me Thanks

Serves 6

INGREDIENTS
1 pound mild Italian sausage
1 small onion diced
3-4 cloves garlic minced
2 pounds Russet potatoes, diced slightly cooked first
6 cups low-sodium chicken stock
3 cups chopped kale or spinach
1 cup heavy cream
½ cup parmesan cheese, shredded
Kosher salt and black pepper, to taste
Olive oil, for garnish

How to Make it:

Brown and crumble Italian sausage in a large stock pot or Dutch oven over medium-high heat. Remove sausage with a slotted spoon from pot. Next cook your onions and garlic till slightly golden. Then you can drain the oil if there is a lot or you want, if there isn't much I leave it for flavor.

Return sausage to pot and add potatoes, chicken stock, ½ teaspoon salt, and ¼ teaspoon black pepper. Bring to a boil and reduce heat to medium. Cook until potatoes are tender, about 10-12 minutes.

Use a slotted spoon to remove ½ of potatoes from pot. In a separate bowl, mash potatoes then return them to the pot. Stir in kale or spinach leaves, heavy cream, and more salt and pepper, to taste. Cook until kale is tender, about 2-3 minutes.

To serve, garnish with shredded parmesan cheese, freshly cracked black pepper, and a drizzle of olive oil.

Make sure to try my recipe, join me on the links above thanks for watching

Wednesday, October 19, 2022

CREAMY CHICKEN MUSHROOM FLORENTINE


Please be sure to follow Me

My Instagram Follow me https://www.instagram.com/craftywitchywoman13

https://cherylstastyhomecooking.blogspot.com/

My tiktok.com/@witchymoonwoman

My Youtube Witchy Woman Cheryl

My Instagram Follow me https://www.instagram.com/craftywitchywoman13

Follow me on Facebook https://www.facebook.com/CherylsCookingandCraftingatHome

My Crafty Blog https://cherylscreationsblog.blogspot.com/

Please be sure to follow Me Thanks

Creamy Chicken Mushroom Florentine is ready in about 30 minutes! It is filled with sun dried tomatoes, green pepper, spinach, mushrooms and the creamiest pasta!


What you Need:

1 pound boneless skinless chicken breasts cut into one inch pieces
1 tablespoon butter
1 teaspoon olive oil
2 cloves garlic minced
1/4 cup sun dried tomatoes
1 small green pepper diced(optional)
4 ounce small mushrooms sliced
1 tablespoon flour
2 cups chicken broth
1 1/2 cup half and half
1 teaspoon salt
1/4 teaspoon pepper
1/2 teaspoon garlic powder
8 ounces linguine broken in half and cooked
1/4 cup grated parmesan cheese
2 cups fresh baby spinach
The sauce for the Pasta gets nice and thick serve over pasta

How to Make it:

Cook pasta as you are cooking the chicken to get it ready to mix in the end.

In a large skillet over medium high heat add the butter and cook the chicken until golden brown and no longer pink. Add the olive oil and cook the garlic, sun dried tomatoes, and mushrooms until tender. Add in the flour and cook for another minute.

Slowly add the chicken broth, half and half, salt, pepper, and garlic powder and whisk until incorporated. Add the cooked pasta and bring just to a simmer. 

Remove from the heat and add the parmesan cheese and spinach and stir until the spinach starts to wilt. Serve immediately.

Tuesday, October 4, 2022

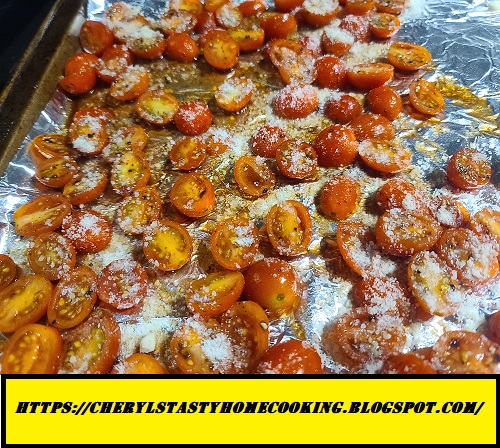
Roasted Garlic Cherry Tomatoes


Sweet Cherry Tomatoes roasted with garlic, spices and a drizzle of Olive Oil, optional Balsamic Vinegar Makes them Melt in your mouth.

Please be sure to follow Me
My tiktok.com/@witchymoonwoman
My Youtube Witchy Woman Cheryl
Please be sure to follow Me Thanks


What you need:

2 tablespoons EVOO

Balsamic Vinegar light drizzle(optional)

1 pint cherry tomatoes

3/4 teaspoon crushed red pepper

1 clove garlic, grated

1 tablespoon chopped fresh marjoram

a dash of garlic powder, onion powder, salt and pepper


How to make it:

Cut your cherry tomatoes in half, place in bowl, drizzle with Olive Oil, Balsamic Vinegar if you like,

top with seasonings, swirl around to coat. Place on Foil lined baking sheet and bake 10-15 minutes in oven, you can also place in air fryer to cook.

Serve as side dish with lamb or chicken.


Parmesan Chicken Breasts


This casserole comes together in no time and is packed with amazing flavor! I served this chicken with Roasted Garlic tomatoes too

Please be sure to follow Me

https://cherylstastyhomecooking.blogspot.com/

My tiktok.com/@witchymoonwoman

My Youtube Witchy Woman Cheryl

My Instagram Follow me https://www.instagram.com/craftywitchywoman13

Follow me on Facebook https://www.facebook.com/CherylsCookingandCraftingatHome

My Crafty Blog https://cherylscreationsblog.blogspot.com/

Please be sure to follow Me Thanks


Servings: 6

What you Need:

6 boneless, skinless chicken breasts(patted dry)

1 cup mayonnaise (or Greek yogurt)

1 cup shredded Parmesan cheese

1 teaspoon seasoning salt

1/2 teaspoon ground black pepper

1 teaspoon garlic powder

1 teaspoon onion powder

1/2 teaspoon paprika

1/2 teaspoon cayenne seasoning(optional)


How to Make it:

In a small bowl, combine the mayonnaise, 3/4 cup Parmesan, seasonings Set aside.

Place diced chicken into a greased 9x13 baking pan.

Spread mayonnaise mixture evenly on top of the chicken.

Sprinkle remaining Parmesan cheese on top of mayonnaise mixture.

Place baking pan in preheated oven, 375 degrees, and bake for 30-35 minutes.


Remove from oven and serve over pasta, rice, or by itself.

Notes

*Remove chicken with slotted spoon to drain off the juices.

Monday, August 22, 2022

Roasted Garlic Cheese Dip


This combination of four cheeses, herbs, and garlic make this a delicious hot dip. Dominos has nothing like this, it's so good.

Please be sure to follow Me

https://cherylstastyhomecooking.blogspot.com/

My tiktok.com/@witchcelesteluna

My Youtube Witchy Woman Cheryl

My Instagram Follow me https://www.instagram.com/mscheriluv/

Follow me on Facebook https://www.facebook.com/CherylsCookingandCraftingatHome

Please be sure to follow Me Thanks


Yield: Serves 4

What you need:

1 head garlic

2 Tbsp olive oil

11 oz mozzarella cheese, shredded

8 oz provolone cheese, shredded

¼ cup freshly grated parmesan cheese

4 oz havarti cheese, shredded

12 oz cream cheese

1 Tbsp oregano

¼ cup fresh basil, chopped

½ tsp onion powder

Pinch of red pepper flakes

Fresh cracked pepper


How to make it:

Preheat oven to 400 degrees. Peel garlic and place garlic cloves on a lined baking sheet. Drizzle olive oil over the garlic and tomatoes and gently shake the pan to make sure everything gets coated evenly in oil. Place baking sheet in oven and roast the garlic for 20-25 minutes. Remove from oven and set aside.

Combine 8 oz of the mozzarella with all of the provolone, parmesan, havarti, and cream cheese in a medium bowl. Once the garlic has cooled, smash each clove with the side of a knife to turn it into a sort of paste. Add the garlic, herbs, and tomatoes to the bowl of cheeses. Stir to combine.

Turn oven down to 350

Lightly butter an oven safe dish (I used a round Pyrex that holds about 1 ½ quarts). Add the cheese mixture to the oven safe dish and sprinkle with the remaining mozzarella cheese. Bake for 30 minutes until the top is golden and the dip is bubbling.

Serve immediately with toasted bread or chips. Also try my Pepperoni Stuffers


Notes: You can substitute flavors of shredded cheese for individual tastes. We use many different cheese combinations.

Friday, July 15, 2022

ROASTED PARMESAN GARLIC ZUCCHINI SPEARS


Please be sure to follow Me

https://cherylstastyhomecooking.blogspot.com/

My tiktok.com/@witchcelesteluna

My Youtube Witchy Woman Cheryl

My Instagram Follow me https://www.instagram.com/mscheriluv/

Follow me on Facebook https://www.facebook.com/CherylsCookingandCraftingatHome

Please be sure to follow Me Thanks

***

Recipe

 Quick and easy zucchini spears coated in parmesan and garlic and roasted in the oven to perfection.


4 SERVINGS


3 zucchini medium sized, about 1 ½ pounds

1 tablespoon olive oil

1 teaspoon lemon juice

2 teaspoons lemon peel grated

1 garlic clove minced

1/2 teaspoon oregano

1/2 teaspoon garlic powder

2 Tablespoons parmesan cheese grated

1 Tablespoon parmesan cheese shredded

salt and pepper

What you need:

Preheat oven to 350 degrees. Cut zucchini lengthwise into quarters, then cut in half widthwise. Line a baking sheet with aluminum foil and spray with cooking spray. Lay the zucchini on the cookie sheet and sprinkle with salt and pepper.

In a small bow whisk together the olive oil, lemon juice, lemon peel, garlic, and oregano. Drizzle over zucchini spears. Sprinkle with parmesan cheese.

Bake for 15 minutes or until lightly golden brown. To give more of a crisp edge, broil for the last 3 minutes.

Nutrition

Serves: 4

Calories74kcal (4%)

How Do You Keep Zucchini From Getting Watery?

Because of its high water content, zucchini can be tricky to cook with. Here are a few ways to troubleshoot so that your zucchini is tender and delicious, not soggy or mushy.

Airflow: Airflow is so important when cooking zucchini. First- make sure you’re not cooking too many spears at a time and that they’re evenly spaced on a baking sheet. Second- I will sometimes put a baking rack on top of my baking sheet and then cook the spears on that so the hot air from the oven can circulate completely.

Cooking Time: Contrary to what you’d think, overcooking zucchini actually makes them release more water. Only cook them for about 15 minutes. If it’s that crispy outside edge you’re looking for, broil for a few minutes instead of adding to the cooking time.

Salt: If you’re dealing with an especially watery zucchini, add your spears to a colander and salt them generously. The salt will draw excess water out. From there, pat them dry with paper towels and then continue the cooking process as usual!

Variations and Serving Suggestions

I love the simple (yet powerful!) combination of parmesan and garlic, but here are a few extra ways to switch up the flavor of your zucchini spears!

Extra Seasonings: Cajun seasoning, lemon pepper, or a pinch of red pepper flakes is usually my go-to when I want to add a little something extra to my zucchini. If you want more heat, try dusting them with smoked paprika or cayenne!

Add Herbs: If you know me, you know that I love me some fresh chopped herbs. In addition to oregano, try adding chopped rosemary, dill, or basil! Not only do they add a pretty garnish, but amazing aromatics and a pop of flavor too!

Dips: The size of these spears makes them perfectly dippable. Try serving them with a side of garlic aioli or whipped feta dip!

Storing Leftover Roasted Zucchini

These zucchini spears make great leftovers! kids are obsessed with the seasoning on them and love having them as a snack.

In the Refrigerator: In an airtight container, your roasted zucchini will last for up to 4 days.

To Reheat: Lay your leftover zucchini spears out on a baking sheet and cook until warm at 400 degrees F.

Note: I don’t recommend freezing leftover zucchini, it gets extremely soggy when it thaws.

Tuesday, July 12, 2022

Honey Garlic Chicken and Veggies


Please be sure to follow Me

https://cherylstastyhomecooking.blogspot.com/

My Tiktok @craftykitchenwitch13

My Youtube Witchy Woman Cheryl

My Instagram Follow me https://www.instagram.com/mscheriluv/

Follow me on Facebook https://www.facebook.com/CherylsCookingandCraftingatHome

Please be sure to follow Me Thanks

This chicken is sweet and just a little garlic and ginger spice makes it delicious, you can eat this plain or put it over Rice.

What you Need:

2 pounds Chicken Tenders

1/2 onion sliced thin

1 bag frozen vegetables you like, or 2 small bags of like carrots, mixed veggies, a bag of peas

I added @7 mushrooms sliced thick

OR

8 ounces Baby Carrots, sliced in half lengthwise

4 cups Broccoli Florets, sliced in half

2 cups Snow Peas

You can use different vegetables

1 teaspoon Sesame Seeds , optional

1 1/2 cups Honey Garlic Sauce

Honey Garlic Sauce

1/2 cup Brown Sugar, packed

4 teaspoons Garlic minced

1 tsp Fresh Ginger, grated

1/2 teaspoon Onion Powder

1/4 cup Soy Sauce

4 tablespoons Honey

2 cups Water, set aside 1/2 cup for cornstarch mixture

3 tablespoon Cornstarch


How to Make it:

First get the sauce together and simmer(see instructions below)

In a large Pot drizzle some olive oil, add chicken cook till white, add onions and cook till translucent.

Add vegetables and simmer together with chicken, if the pan is too dry, add a drizzle of Olive oil but not too much.

Add a little salt, pepper, and spices you like(I used onion powder, garlic powder, a touch of paprika)

When the vegetables are hot and cooked just till tender remove from heat.

Sprinkle with sesame seeds. (optional)

Serve immediately.

***

Honey Garlic Sauce

In a medium saucepan combine brown sugar, garlic, ginger, onion powder, soy sauce, honey, and 1 1/2 cups of water.  Cook over medium high heat until it comes to a boil, whisking constantly. 

In a small bowl combine cornstarch and the remaining 1/2 cup of water. Whisk them together and then slowly pour the cornstarch mixture into the sauce whisking constantly.

Continue to cook for about 10 minutes or until sauce thickens to a point where it will coat the back of a spoon.

Remove from heat and use immediately or let cool and then store in an airtight container in the refrigerator for up to 1 week.


Friday, July 8, 2022

Warm Chicken Ranch Wraps


These are so good, easy to make too You can either fry or grill the chicken, your choice. Another nice thing about these is that they take care of all your food groups in one wrap!

Please be sure to follow Me

https://cherylstastyhomecooking.blogspot.com/

My Tiktok @craftykitchenwitch13

My Youtube Witchy Woman Cheryl

My Instagram Follow me https://www.instagram.com/mscheriluv/

Follow me on Facebook https://www.facebook.com/CherylsCookingandCraftingatHome

Please be sure to follow Me Thanks


What you Need:

Serves 8

8 skinless, boneless chicken breasts

1 small onion diced

1 or 2 small peppers diced(I used the mini peppers) you can use what you like

4-5 garlic cloves minced

1 cup cooked rice

1/2 cup ranch-style salad dressing

1 teaspoon salt

1/4 teaspoon ground black pepper, onion powder, garlic powder

1/4 teaspoon cayenne pepper(optional)

1/2 teaspoon paprika

1 cup vegetable oil

8 (10 inch) flour tortillas

2 cups shredded lettuce

1 can diced tomatoes(I used basil herb tomatoes) any flavor you like works


How to make them:

Cut chicken breast into strips.

Grilled chicken method: Spray a large skillet with nonstick cooking spray. Add chicken, cook over medium-high heat 12 to 15 minutes, or until light brown and juices run clear. Add onion,  garlic, peppers and cook 5 minutes. . Next add the can of tomatoes mix in cook just another 2 minutes to heat through. Add the cooked rice, stir all together cover and remove form the heat and let stand for 5 minutes and Stir in the salad dressing.

Fried Chicken Method: Dip chicken into buttermilk then roll them in the flour mixture. Fry for 3 minutes each side in a 350 degrees F (175 degrees C) skillet with 1 cup of oil in it. Cook the onions, garlic, peppers up till just golden, stir in tomatoes let it warm up the tomatoes then add cooked rice, gently stir all to mix.  Stir in the salad dressing. last toss in the chicken mix gently

Fill each warm tortilla with chicken and rice mixture. Fold in both sides of the wrap. Holding in the folded sides roll the wrap tightly from the bottom to the top, keeping the ingredients firmly packed as you go. Slice each wrap in half diagonally and serve.

The mixture is ready to place in tortillas

Thanks for following me and trying these delicious recipes

Sunday, June 12, 2022

Creamy Garlic Mushrooms and Bacon


Creamy Garlic Mushrooms and bacon in a mouthwatering cheesy sauce as a side or main. The best Low Carb or Keto Mushroom Recipe!

Please be sure to follow Me

https://cherylstastyhomecooking.blogspot.com/

My Tiktok @craftykitchenwitch13

My Youtube Witchy Woman Cheryl

My Instagram Follow me https://www.instagram.com/mscheriluv/

Follow me on Facebook https://www.facebook.com/CherylsCookingandCraftingatHome

Please be sure to follow Me Thanks

Servings: 8

Calories: 387 kcal


What you need:

1-2 strips bacon, cut into strips

1 tablespoons butter

16 ounces brown mushrooms, washed (pat dry with paper towle)

1 tablespoon olive oil

1/4 cup dry white wine (or chicken broth/stock)

6 cloves garlic finely chopped

1/2 cup heavy cream, (thickened cream or evaporated milk)

1 teaspoon fresh chopped parsley

1 teaspoon fresh chopped thyme

Salt and pepper to season

1/4 cup fresh shredded or grated mozzarella

1/4 cup fresh shredded or grated parmesan cheese

How to make it:

Fry the bacon in a large oven-safe skillet over medium heat until crispy. Use a slotted spoon to transfer to a paper towel lined plate to soak up some of the oil. Set aside.

In the same pan, melt the butter. Add the mushrooms, drizzle with oil and mix through, scraping up any browned bits from the bottom of the pan. Fry for 2-3 minutes to lightly brown mushrooms and release their juices (if any). 

Pour in the wine (or broth) and let reduce for 2 minutes, while occasionally stirring. 

(Preheat broiler or oven grill.)

Add in the garlic and stir it through for a minute, until fragrant. Pour in the cream and herbs. Reduce heat down to low. Gently simmer until tender (about 4-5 minutes) and sauce is slightly thickened. Season with salt and pepper.

Add the bacon back in and give everything a good mix to combine all of the flavours together. Top the mushrooms with the mozzarella and parmesan cheese.

Broil until cheese is melted and bubbly and mushrooms are done to your liking (about 3-5 minutes).

Serve warm.

Monday, January 24, 2022

Roasted Garlic Bread


Garlicy, Buttery Goodness right here, bake your garlic, mix with butter and other herbs and cheese and bake. So Delicious.

Please be sure to follow my blog

https://cherylstastyhomecooking.blogspot.com/

My Instagram Follow me

https://www.instagram.com/mscheriluv/

Follow me on Facebook

https://www.facebook.com/CherylsCookingandCraftingatHome

Please be sure to follow my blog

8 servings

What you need:

3 heads garlic
2 tablespoons olive oil
1 (1 pound) loaf Italian bread
½ cup butter
1 tablespoon chopped fresh parsley (Optional)
2 tablespoons grated Parmesan cheese (Optional)

How to Make it:

Preheat the oven to 350 degrees F Slice the tops off of garlic heads so the tip of each clove is exposed. Place garlic on a baking sheet and drizzle with olive oil. Bake until garlic is soft, about 30 minutes.

Squeeze the cloves of garlic from their skins into a medium bowl. Stir in the butter, parsley, and Parmesan cheese until well blended. Spread onto the cut sides of the bread.

Set the oven to broil. Slice the loaf of bread in half horizontally, and place cut-side up on a baking sheet.

Broil bread until toasted, about 5 minutes. You can add shredded cheese and bake a couple minutes longer to melt if you like.


Saturday, January 15, 2022

Stuffed Mushrooms


Please be sure to follow my blog

https://cherylstastyhomecooking.blogspot.com/

My Instagram Follow me

https://www.instagram.com/mscheriluv/

Follow me on Facebook

https://www.facebook.com/CherylsCookingandCraftingatHome

Please be sure to follow my blog

Stuffed Mushrooms are so good they get asked for often here, so here is my recipe for really good ones.

What you Need:

20 large mushrooms (scrubbed clean and stems separated)
1 tablespoon Olive oil
2 tablespoon Minced shallots or minced onion
1 Large garlic clove (minced)
Salt
3 tablespoon Chopped parsley
1 teaspoon dried thyme
2 tablespoon breadcrumbs
2 tablespoon Vegetable stock
2 tablespoon Olive oil
2 tablespoon Grated parmesan cheese
Any Shredded cheese you prefer for topping before baking

How to Make them:

Preheat oven to 375 degrees F.

Finely chop mushroom stems. Heat 1 tablespoon olive oil in a small frying pan over medium-high heat. Sauté the chopped mushroom stems and the shallots for 4-5 minutes, stirring often.

Add the garlic and almonds and sprinkle with salt. Stir well and sauté 2 more minutes. Turn off the heat and add the parsley, herbs and breadcrumbs.

Pour the vegetable stock into a food processor, then the rest of the stuffing. Pulse several times to get a fine mixture, almost a paste.

Fill each mushroom with the stuffing. Sprinkle grated parmesan and a little shredded cheese over each mushroom and bake for 20-25 minutes, or until the cheese browns a little. Allow to cool for 5 minutes or so before serving.

Try my recipe for Teriyaki Steak Rolls

https://cherylstastyhomecooking.blogspot.com/2022/01/teriyaki-steak-rolls.html


Tuesday, December 28, 2021

Parmesan Crusted Baked Chicken

This Melt In Your Mouth Chicken Bake is a flavorful chicken dish that will easily become a favorite! Only a few ingredients needed, most of which you may already have on hand

Please be sure to follow my blog

https://cherylstastyhomecooking.blogspot.com/

My Instagram Follow me

https://www.instagram.com/mscheriluv/

Follow me on Facebook

https://www.facebook.com/CherylsCookingandCraftingatHome

Please be sure to follow my blog

Servings: 6

Ingredients

1 lb chicken breasts, boneless/diced
3/4 cup mayonnaise or Greek yogurt
1 cup Parmesan cheese, shredded
1/2 teaspoon seasoned salt
1/2 teaspoon ground black pepper
4 garlic cloves, minced
1/2 teaspoon red pepper flakes
1/4 cup Italian bread crumbs

Instructions

Grease a 9 x 13 baking pan and place diced chicken on the bottom. Put on a pot of water to boil for spaghetti.

In a small bowl, combine the mayonnaise (or yogurt), Parmesan cheese, seasoned salt, pepper, garlic, and red pepper flakes.

Spread mixture evenly on top of chicken.

Sprinkle bread crumbs on top of mayonnaise mixture.

Place pan in preheated oven, 375 degrees, and bake for about 30-35 minutes, or until chicken is cooked through.

Remove pan from oven and use a slotted spoon to serve chicken on top of pasta, rice, or by itself. Enjoy!

A side dish I cooked with this is Oven Roasted Tomatoes, https://cherylstastyhomecooking.blogspot.com/2021/12/roasted-cherry-tomatoes.html I served some on top, get the recipe here

Tuesday, September 14, 2021

Garlic Mushroom Chicken with Jalapenos over Ginger Rice

A little spicy dish, want less spice? Remove the seeds of the Jalapenos and it won't be too spicy.

or Leave them out substitute another vegetable like water chestnuts or green peppers.

Please be sure to follow my blog

My Instagram Follow me

https://www.instagram.com/mscheriluv/

Follow me on Facebook

https://www.facebook.com/CherylsCookingandCraftingatHome

Please be sure to follow my blog


Serves 4

What you need:

2 chicken breasts, boneless sliced or chunked
1 onion diced
3-4 garlic cloves minced
1 or more Jalapenos sliced, seeds removed 
olive oil
1/2 cup vegetable or chicken broth
sea salt, pepper
2 cups cooked rice you could put it over buttered  noodles too


How to make it:

I serve this over ginger rice, any rice you like will work, recipe below how I make ginger rice,

Heat skillet with 2 teaspoons olive oil, once hot add chicken and cook it, as chicken is turning white, add onions and garlic and cook about 2 more minutes, when chicken is no longer showing any signs of pick, remove from skillet and place in a bowl or dish, set aside.

Now add 1 more teaspoon of olive oil to pan when hot once again add 1/2 cup broth, let heat up, then add Jalapenos and mushrooms cook about 3 minutes and add chicken veggies back into skillet stir to mix.

Ginger rice

How to Make it:

Cook 2 cups of rice, once cooked

I add 3 tablespoons butter to the rice, and 1-2 teaspoons of ginger, I would start with one until you know how you like it?

Garlic Parmesan Pasta with Mushroom and Spinach

Here is a vegetarian dish that is really creamy full of flavors of garlic, parmesan, Italian seasonings, red pepper flakes if you like them, and mushrooms and spinach. If you want you may add chicken or beef just cook it ahead and add in to the sauce with the rest and serve.

#recipeideas #Ilovetocook #comfortfoods #cooking #goodfoods #pastarecipes #vegetarianrecipes

Please be sure to follow my blog

My Instagram Follow me

https://www.instagram.com/mscheriluv/

Follow me on Facebook

https://www.facebook.com/CherylsCookingandCraftingatHome

Please be sure to follow my blog

4 SERVINGS   

What you Need:

14 oz pasta(your choice)
3 tablespoons olive oil
2 medium onions, sliced
3 or 4 cloves garlic, minced
14 oz mushrooms, sliced
10 oz fresh spinach
1/2 cup low-sodium vegetable broth
Fresh cracked pepper, to taste
1 teaspoon Italian seasoning
1/2 cup parmesan cheese, grated
1/2 cup heavy whipping cream
1 teaspoon red chili pepper flakes, optional

How to make it:

To make the creamy parmesan spinach mushroom pasta skillet: Cook the pasta in salted water until al dente, according to the package instructions.

Heat 1 tablespoon olive oil in a large skillet. Add the onion and saute for 2-3 minutes until translucent and slightly browned. Remove from the skillet and transfer to a plate.

In the same skillet, add the mushrooms and sauté for about 3 minutes until browned. Add a bit of oil if necessary. Remove mushrooms to the plate with onion and set aside.

In the same skillet, add the spinach and cook for 2 minutes until just wilted. Adjust seasoning with salt and pepper. Remove spinach and drain excess water. Transfer to another plate.

Still in the same skillet, heat a little oil, add the chopped garlic and cook for about 30 seconds, then deglaze with vegetable broth. Add cream, grated parmesan, chili pepper flakes, and Italian seasoning and cook for 2 minutes, stirring until combined and the cream gets some color.

Once the pasta is ready, add mushrooms, onion, and spinach back to the skillet, then put drained pasta and toss to combine. Add more parmesan and Italian seasoning and give a quick stir. Serve the creamy parmesan spinach mushroom pasta with red chili pepper flakes and more parmesan, if you like. Enjoy!


Monday, August 9, 2021

Garlic Shitake Mushrooms Asparagus with Rice


Please be sure to follow my blog

My Instagram Follow me

https://www.instagram.com/mscheriluv/

Follow me on Facebook

https://www.facebook.com/CherylsCookingandCraftingatHome

Please be sure to follow my blog

Want to eat more vegetables that taste delicious and leave the meats in the freezer tonight? Then this dish is just what you should try. It's easy and so full of flavor.

Serves 4

What you need:

16 oz of Shitake Mushrooms sliced
1 bunch of fresh Asparagus trimmed and sliced
5-6 cloves of garlic sliced thin
1 small red onion sliced thin or diced(or half a large)
1/4 cup of butter(I use unsalted)
2-4 cups cooked rice
dash of sea salt and cracked pepper
A shake of everything bagel seasoning(optional)
Low salt soy sauce (optional)

How to make it:

Cook the rice as directed on package, I use a rice cooker it cooks perfect every time.
Prepare the vegetables, heat a skillet till not but not burning, I use medium heat
Melt the butter quick, then add the garlic and onions cook just till tender about 2 minutes
Then add the Asparagus and cook about 4-5 minutes till tender, add Mushrooms and cook 
another 3-4 minutes just till barely tender. Serve over rice, I add a sprinkling of soy sauce which is optional.


Tuesday, July 27, 2021

LEMON GARLIC SHRIMP


Please be sure to follow my blog

My Instagram Follow me

https://www.instagram.com/mscheriluv/

Follow me on Facebook

https://www.facebook.com/CherylsCookingandCraftingatHome

Please be sure to follow my blog

Lemon garlic shrimp is bursting with flavor, easily ready in just 20 minutes!


INGREDIENTS

2 pounds large shrimp, peeled and deveined
1 teaspoon kosher salt
1 teaspoon cracked black pepper
6 tablespoons unsalted butter, divided
4 cloves garlic, minced
3/4 cup fresh lemon juice
1/4 cup chopped fresh parsley, divided

How to make it:

Prepare ingredients before you begin cooking. Do not skip this step.

In a large skillet over medium-high heat, melt 2 tablespoons butter.

Add garlic to the skillet and cook about 1 minute.

Add shrimp, salt, and pepper. Cook for 1 minute without stirring. Continue cooking until shrimp begin turning pink (about 2-3 minutes).

Remove shrimp from pan and set aside in a bowl. (They will be returned to the skillet to continue cooking).

Add lemon juice to skillet and bring to a boil. Reduce to simmer and cook until liquid is reduced by half.

Add remaining butter and cook until melted. Add 1/2 of parsley. Stir to combine. Add shrimp back into the pan. Stir to combine. Cook until shrimp are opaque, about 2-3 minutes stirring occasionally.

Top with remaining parsley and serve with a lemon wedge if desired.

Serve with vegetables and enjoy!

Thursday, February 18, 2021

Roasted Garlic


Years ago I had a cold and a friend of mine showed me how to roast garlic whole and eat the warm, toasty cloves right out of the head. Not only was this simple, but I learned it helps heal as well! And perfect for garlic lovers.
Roasting garlic changes the chemical makeup of the garlic so that it's easier to digest. You can eat a lot more garlic if it is completely cooked, with fewer side effects than you would get from eating raw garlic. (If you're into chemistry, you can read more about this process in the Wikipedia.)
Eat the caramelized roasted cloves directly out of the heads, or add them to pasta dishes, mash them up and spread them over toast, or mix them with sour cream for a dip.
If you are sensitive to raw garlic, you may find that you can much more easily eat roasted garlic

SERVING 1 
1 head roasted garlic per person

Ingredients
One or more whole heads of garlic
Extra virgin olive oil

Preheat your oven to 400°F (205° C)
A toaster oven works great for this.
Peel and discard the papery outer layers of the whole garlic bulb, leaving intact the skins of the individual cloves of garlic
Using a sharp knife, cut 1/4 to a 1/2 inch from the top of cloves, exposing the individual cloves of garlic.
Put garlic in baking pan or muffin tin
Place the garlic heads in a baking pan, cut side up. (A muffin pan works great for this, as it keeps the garlic bulbs from rolling around.)
Drizzle with olive oil
Drizzle a couple teaspoons of olive oil over each exposed head, using your fingers to rub the olive oil over all the cut, exposed garlic cloves.
Cover the bulb with aluminum foil
Bake
Bake at 400°F (205°C) for 30-40 minutes, or until the cloves are lightly browned and feel soft when pressed.
Cool and remove roasted garlic cloves from their skins
Allow the garlic to cool enough so you can touch it without burning yourself. Use a small small knife cut the skin slightly around each clove. Use a cocktail fork or your fingers to pull or squeeze the roasted garlic cloves out of their skins.
Eat as is (I love straight roasted garlic) or mash with a fork and use for cooking. Can be spread over warm French bread, mixed with sour cream for a topping for baked potatoes, or mixed in with Parmesan and pasta.